Renegade exhausts are awesome. You should own one. The people who make them are the best. But, actually, this page is for people who already own Renegade exhausts and are wondering what’s involved in replacing its wool packing. I think you’re supposed to change the wool every 4,000 miles if you have a carbon fiber muffler or every 5,000 miles if it’s made of some kind of metal.
Supposedly, the carbon fiber mufflers could turn brown if you wait much longer than the 4,000 miles. My carbon fiber is a little “different” for a few inches near the end of the muffler that’s closest to the engine. I think it’s because the original packing really got burned away – as you can see in the photos below – heating up the carbon fiber. Interestingly, the packing job you see documented below has held up a lot better than the original one. (I’ve just repacked it a second time. When I opened it I actually found that it didn’t need it at all – the wool was fine after a year and a half)
Anyway, Renegade doesn’t usually include instructions when they send you something so I documented what I did to repack my muffler – mainly so I remember what to do every time. This document may help you to repack yours, but you can’t yell at me if there’s a problem since I kind of guessed at all of this:
(in case it’s not obvious, you can click on the images for larger versions – some of the photos have more information that you really should see)
 Figure 1. So the first step is to take the muffler off. You’ll need a 10mm socket for the pipe clamp that connects the muffler to the exhaust pipe and a 1/2″ socket for the hanger bolt.
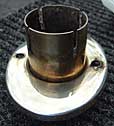
 Figure 2. Once the muffler’s off the bike, you’ll need to remove the 2 hex nuts from the the end cap. The 2 nuts are on the end of the muffler that faces the engine. The other end doesn’t have these hex nuts. In my case, one of the nuts was fairly hard to remove. You’d better have one of those hex wrenches with a handle on it so you can get some leverage. I got a neat set from Home Depot with a yellow plastic handle for about USD$10. The hex wrench (aka alan key) size is 5mm.
After you’ve removed the 2 nuts, you can remove the cap. You’ll need to pull really hard and keep working it from side to side. It’s stuck in there from the silicone that Jorge puts inside. Once it starts coming up, you’ll be able to see the silicone that’s still holding it on. You can use a utility knife to cut that stuff and take the cap off. If it’s really super stubborn, you could put a wood block up against the edge and whack it with a mallet. Be very careful so you don’t bend anything metal or crack anything carbon.
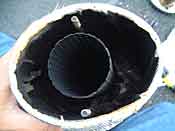
 Figure 3. Here’s what the muffler looks like with the end cap removed. Notice that there’s no wool up near the open end of the muffer! That doesn’t seem good. Anyway, to reach in there and start taking out the old wool, I used a pair of pliers.
 Figure 4. Ooh, that’s a nice piece! It’s sort of like picking your nose. Most of the pulling with the pliers will get just bits of wool, but once in a while you’ll get a nice chunk of it like this. Anyway, keep reading because I probably won’t bother with the pliers next time.
 Figure 5. The first time I did this, I used the pliers to pull out all the wool, which took a while. It would be easier to take the other end cap off and just pull the inside pipe right out of the can – wool and all! If you look at this photo you can see that the other “end” of the muffler is actually attached to the pipe that goes down the center. To get the pipe/cap piece out I had to pull and twist like mad since this end is also held in with silicone (as shown in the photo). I needed to use the utility knife like before, too. After that first time of struggling, I came up with a newer, easier technique: I put a short 2×4 inch piece of wood in the open end of the can. I then whack the 2×4 with a mallet, which slowly works off the second end. You should be able to pull the whole thing out at that point, but you’ll probably have to loosen the band that goes around the middle of the can so the wool won’t be squeezed by it.
 Figure 6. Something to notice now that the pipe/cap piece is removed is that the steel wool that covers the pipe has all moved to one end. I probably did this while removing all that wool. Before I went any further, I spread it back across the length of the pipe. Do yourself a big favor and don’t touch the wool without gloves and a long sleeve shirt. I suspect there’s fiberglas in the wool that I got from Jorge because the second time I dealt with it, I ended up itching for a day even after washing 4 times! It felt like little needles were stabbing me everywhere.
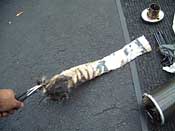
 Figure 7. Now to cut the replacement wool that I got from Renegade. I chose to do this since the piece that they gave me was slightly wider than the muffler itself. So, here I am lining it up with my muffler so I can cut the strip to the “correct” width. Look in the left side of the photo – that’s the silicone I’m going to use later.
 Figure 8. Now, the way I decided to put the new wool in was to roll it tightly around the steel-wool-covered pipe. I then squeezed the wrapped pipe back into the carbon fiber shell. Before doing that, however, I put silicone around the inside edge of the cap – just as Jorge at Renegade seems to have done originally.
 Figure 9. Once that was in place, I used a broomstick to pack it in tightly. Actually I think I started to use the broomstick and found that packing it with my fingers worked better. Everything was already packed in the carbon fiber shell so tightly that I didn’t have to “pack it in” as much as I thought I would have. You should have a broomstick handy just in case yours isn’t packed as tightly as mine was.
![]() Figure 10. Before putting the end cap back on, I put silicone around the inside edge of the cap like I did before. I also put a bead of silicone around the part of the coupling that connects to the holey pipe in the center of the muffler. Be sure to also put silicone where this coupler attaches to the exhaust pipe. Otherwise, you might get exhaust leaks which can causing popping noises. Reattach the clamp and the hanger bolt that you took off at the start and you’re done!
Figure 10. Before putting the end cap back on, I put silicone around the inside edge of the cap like I did before. I also put a bead of silicone around the part of the coupling that connects to the holey pipe in the center of the muffler. Be sure to also put silicone where this coupler attaches to the exhaust pipe. Otherwise, you might get exhaust leaks which can causing popping noises. Reattach the clamp and the hanger bolt that you took off at the start and you’re done!
One note about putting the caps back on – it’s a real pain if you squeezed as much wool in there as I did. This latest time, I used a bar clamp to help squeeze the carbon fiber in on the sides, making it less round and more oval – like it needs to be for the cap to fit on. Also, I gave the cap a few taps with a rubber mallet to get it down around the carbon fiber as well. This system worked great.
I waited 24 hours before starting the bike, just to make sure the silicone was all hardened. You can peel/cut off any excess silicone after it dries. That works on the pipes, but I was afraid to try that with the carbon fiber so I made sure I cleaned any wet silicone off of the carbon after everything was reattached.
This whole job was a little bit more of a hassle than I thought it would be because of the difficulty in taking off the ends of the muffler. Get ready for a hassle as far as that goes. Putting them back on was a pain, too. Putting them on neatly, anyway. Putting the last end cap back on was especially painful since lining the screws up with the holes was a bit hard to do. Good luck and have patience. It definitely gets easier every time.
 This work is licensed under a
Creative Commons Attribution-NonCommercial-NoDerivs 3.0 License.