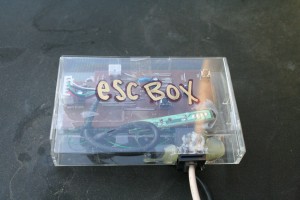
I made a big red button to replace the Escape key. A museum that I’m consulting for needs this for a touch-screen kiosk that runs Crayon Physics.
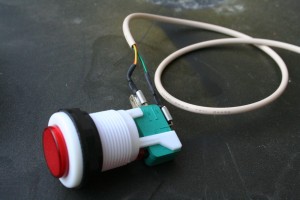
USB on one end, big red arcade-style microswitch on the other. Basically I took the guts out of a USB keyboard and transplanted them into a cassette tape holder to make the whole thing smaller. Note the RJ-11 phone jack for the button cable (just because I have a ton of the jacks laying around, along with the crimping tool and 500′ of telephone wire). The button is made to survive a million smashes and the microswitch itself can be popped out and replaced with no tools when it finally reaches that limit. It also makes a really satisfying click when it’s pressed.
The whole reason for this thing is that the touch-screen kiosk where Crayon Physics is played doesn’t have a keyboard, and it turns out that the only way to restart the levels is by using the Escape key. I suggested a big button on the front of the enclosure that holds the touch screen. Here it is:
If you’re planning to make one of these, you’ll need a USB keyboard, a normally-open momentary switch, some wire, a soldering iron and a multimeter. Here’s a basic description of the process:
1) After taking apart the keyboard, you’ll see that there is a sandwich of two clear plastic sheets inside. Basically, pressing a key on the keyboard causes a contact on the upper sheet to touch the corresponding contact on the sheet below it.
2) Find the contacts that correspond to the Escape key. For the contact on the upper sheet, use a marker to trace its path back to the keyboard’s printed circuit board. Make a note of the point on the board where this path led you.
3) Do the same thing for the other clear plastic sheet.
4) Double check what you’ve found using the “continuity” feature of a multimeter – does that point on the plastic sheet really connect to that point on the board, or did your marker stray from the path somewhere? Now you know the two points on the circuit board that need to be momentarily connected to each other to simulate an Escape keypress.
5) Once you’ve got that easy stuff done, you’ll need to connect each of those points on the circuit board to the two terminals of the pushbutton, using wire. Soldering to the board might be difficult if you’re new to soldering, since it’s probably just a tiny pad and not a hole or a pin that you’re soldering to. My advice is to use thin, “wire wrap” wire since it should be easier to solder onto the board’s tiny pads. Use a decent soldering iron with a small tip. Also, make sure you use epoxy or hot glue to make sure the wires stay in place and don’t stress the delicate solder joint.
6) Cross your fingers and plug the USB cable into your computer. Wait for Windows to recognize the new device and test it in a “Save as…” dialog or something simple like that.
[PS: You’re doing this at your own risk, so you can’t blame me if something goes wrong! Good luck]


